
Shower Tile Mold Mould & Damp Guide Part 1
Introduction
Mould and dampness in shower tiles can be an unsightly and unwelcome problem in many homes. Not only can it compromise the appearance of your bathroom, but it can also lead to more serious issues if left untreated. This guide will walk you through understanding the causes of mould and damp, how to effectively remove it, and tips for prevention.
What Causes Mould & Damp?
Mould thrives in environments that are warm, dark, and humid. In the bathroom, particularly on shower tiles, these conditions are common due to:
1. High Humidity: Showers create steam, raising the humidity levels, which can lead to mould growth.
2. Poor Ventilation: Bathrooms without proper ventilation traps moisture, creating an ideal environment for mould.
3. Water Leaks: Dripping faucets or showerheads can contribute to dampness.
4. Old Grout and Sealant: Worn out grout and sealant can allow moisture to seep in and promote mould growth.
Understanding these causes is crucial for effective remediation.
Why This Problem Happens
The shower is often the most humid room in your home, especially after a hot shower. If the moisture cannot escape, it settles on surfaces. Mould spores, which are present in the air, find this damp environment perfect for growth. Over time, if not addressed, it can lead to unsightly stains on tiles and grout, and even damage to underlying structures.
How to Fix Mould & Damp (Step-by-Step)
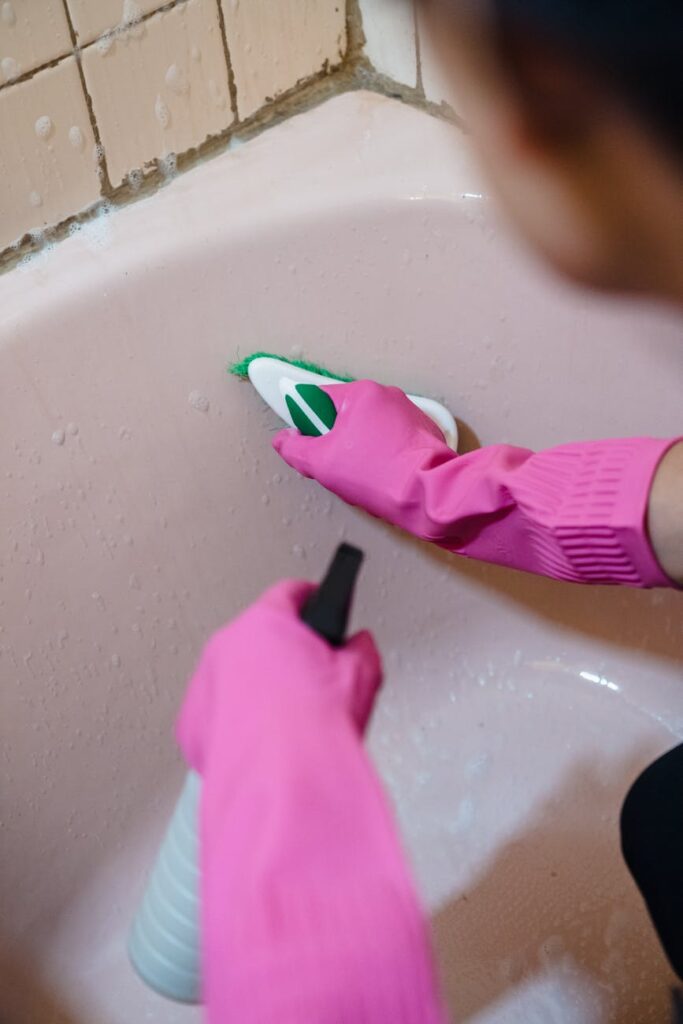
1. Gather Your Supplies: You will need:
- Rubber gloves
- Safety goggles
- Scrub brush or sponge
- Bucket
- Cleaning solution (see Best Cleaning Methods)
- Old toothbrush (for grout)
- Spray bottle
- Vinegar and Water: A natural solution that kills most mould spores.
- Baking Soda Paste: Mix baking soda with water to form a paste. Apply it to the affected areas and scrub.
- Hydrogen Peroxide: A stronger option; spray it on, let it sit for 10 minutes, and scrub.
- Commercial Mould Removers: For tough mould, consider professional products designed specifically for bathroom surfaces.
- Aim for weekly cleanings to keep mould at bay.
- Bleach can kill mould on non-porous surfaces but may not penetrate grout effectively. Use alternatives like vinegar or hydrogen peroxide for better results.
- Signs include discolored grout, a musty smell, or peeling paint on nearby walls.
- If you see black mould and have health concerns, consider consulting a professional for testing.
- Use a baking soda paste or hydrogen peroxide, scrub, and rinse thoroughly.
- If cleaning doesn’t work and the grout is cracked, it may need to be replaced to prevent moisture retention.
2. Ensure Proper Ventilation: Open windows and turn on exhaust fans to reduce humidity.
3. Prepare Your Cleaning Solution: You can use a commercial mould remover or create your own with equal parts vinegar and water or water and baking soda.
4. Apply the Solution: Use a spray bottle to apply your cleaning solution liberally to the affected areas. Let it sit for at least 10-15 minutes.
5. Scrub the Area: Using a scrub brush or sponge, scrub the tiles and grout. For stubborn mould, you might need to use an old toothbrush to get into the grout lines.
6. Rinse Thoroughly: After scrubbing, rinse the area with warm water to remove any remaining cleaning solution and mould.
7. Dry the Area: Wipe down the tiles with a clean towel or let them air dry. Make sure the area is as dry as possible to prevent future mould growth.
8. Inspect and Seal: After cleaning, inspect your grout and sealant. If you notice any cracks, it might be time to reapply grout or sealant to prevent moisture seepage.
Best Cleaning Methods
Common Mistakes to Avoid
1. Neglecting Grout: Focusing only on tiles and ignoring grout can lead to recurring mould problems.
2. Inadequate Ventilation: Not improving ventilation can negate your cleaning efforts.
3. Using the Wrong Products: Some cleaning products can damage tiles or worsen mould growth. Always check compatibility.
4. Skipping Prevention: Failing to take preventive measures after cleaning can lead to rapid regrowth of mould.
Prevention Tips
1. Improve Ventilation: Install an exhaust fan or open windows during and after showers to reduce humidity levels.
2. Use a Squeegee: After each use, quickly squeegee the tiles to remove excess water.
3. Regular Cleaning: Clean your shower tiles weekly to prevent mould from establishing.
4. Seal Grout: Apply a grout sealant every six months to a year to protect against moisture.
5. Monitor for Leaks: Regularly check for leaks and fix them promptly to reduce dampness.
Frequently Asked Questions
1. How often should I clean my shower to prevent mould?
2. Can I use bleach to clean mould?
3. What are the signs of mould behind tiles?
4. How can I tell if the mould is toxic?
5. How can I remove mould stains from grout?
6. Is it necessary to replace grout if it’s mouldy?
By following this guide, you can effectively tackle and prevent mould and damp in your shower tiles, ensuring a cleaner and healthier bathroom environment. Stay tuned for Part 2, where we will delve deeper into advanced mould prevention techniques and solutions.