
Shower Mold Cleaning Guide Part 1
Introduction
Shower mold is a common nuisance that can turn your relaxing bathing space into a breeding ground for unsightly and unhealthy growth. Not only does it affect the aesthetics of your bathroom, but it can also pose risks to your health. In this guide, we’ll explore the causes of shower mold, how to effectively clean it, and tips for preventing its return.
What Causes Shower Mold?
Shower mold typically thrives in damp, warm environments, making your shower the perfect breeding ground. The primary factors contributing to mold growth include:
1. Humidity: High moisture levels from showers create an ideal environment for mold.
2. Poor Ventilation: Lack of airflow traps humidity, allowing mold to flourish.
3. Organic Materials: Soap scum, body oils, and hair provide food for mold spores.
4. Temperature Fluctuations: Warm temperatures encourage mold growth.
Understanding these causes is the first step toward effective cleaning and prevention.
Why This Problem Happens
Mold spores are present in the air and can settle on surfaces, especially in moist areas. When conditions are favorable—like high humidity and organic matter—these spores can grow rapidly. Bathrooms, particularly showers, often lack sufficient ventilation, which exacerbates the problem. Additionally, neglecting regular cleaning can lead to a buildup of soap scum and grime, creating a perfect habitat for mold.
How to Fix Shower Mold (Step-by-Step)
Cleaning shower mold requires a systematic approach. Follow these steps for effective results:
Step 1: Gather Your Supplies
Prepare your cleaning kit with the following items:
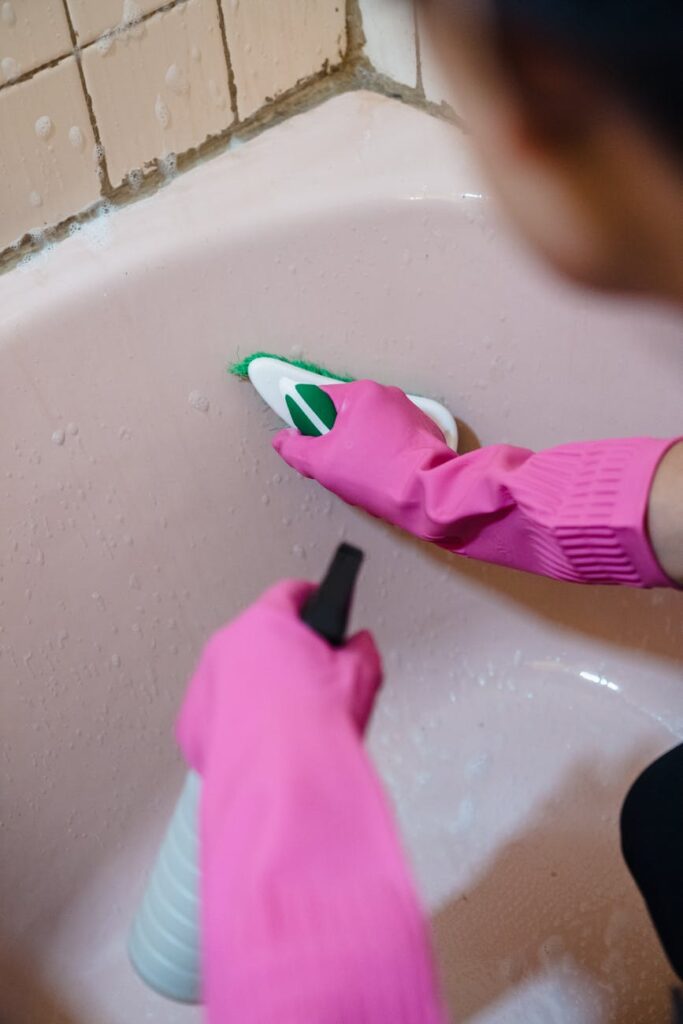
- Rubber gloves
- Mask (to avoid inhaling spores)
- Scrub brush or sponge
- Bucket
- Spray bottle
- Cleaning solution (homemade or store-bought)
- Rags or paper towels
- Optional: A toothbrush for tight spaces
- Vinegar and Water: Mix equal parts vinegar and water in a spray bottle.
- Baking Soda Paste: Combine baking soda with water to form a paste.
- Commercial Mold Remover: Follow the manufacturer’s instructions.
Step 2: Choose Your Cleaning Solution
You can use a variety of cleaning solutions, including:
Step 3: Apply the Cleaning Solution
Spray your chosen solution generously on the affected areas, including grout lines and corners where mold tends to accumulate. Allow it to sit for at least 10-15 minutes. This will help break down the mold and make scrubbing easier.
Step 4: Scrub the Affected Areas
Using your scrub brush or sponge, scrub the moldy areas vigorously. For stubborn spots, a toothbrush can help reach tight spaces. Rinse the area with warm water as you go to prevent the solution from drying out.
Step 5: Rinse Thoroughly
After scrubbing, rinse the shower thoroughly with warm water to remove any remaining cleaning solution and loosened mold.
Step 6: Dry the Area
Use a clean towel to dry the shower walls and floor. This step is crucial, as moisture left behind can lead to mold regrowth.
Best Cleaning Methods
While there are various methods to tackle shower mold, some are more effective than others. Here are the best options:
1. Vinegar and Baking Soda
The combination of vinegar and baking soda is effective in breaking down mold and mildew. The acidity of vinegar helps kill mold spores, while baking soda acts as a gentle abrasive.
2. Hydrogen Peroxide
Hydrogen peroxide is a potent mold killer. Use a 3% solution, spray it on the moldy area, let it sit for 10 minutes, and scrub it away.
3. Commercial Mold Cleaners
For severe mold infestations, consider using a commercial mold cleaner. Be sure to follow the instructions carefully and use the appropriate safety gear.
Common Mistakes to Avoid
When cleaning shower mold, be mindful of these common pitfalls:
1. Skipping Safety Gear: Always wear gloves and a mask to protect yourself from mold spores.
2. Not Allowing Solutions to Sit: Rushing the process can reduce the effectiveness of your cleaning solution.
3. Using the Wrong Tools: Avoid abrasive pads that can scratch surfaces.
4. Neglecting Ventilation: Failure to ventilate the bathroom can worsen mold growth after cleaning.
5. Ignoring Grout: Mold often hides in grout lines, so don’t overlook these areas during cleaning.
Prevention Tips
Preventing shower mold is far easier than removing it. Here are some effective strategies:
1. Ventilation: Always turn on the bathroom fan during and after showers to reduce humidity.
2. Wipe Down Surfaces: After each use, wipe down shower walls and doors with a towel to remove excess moisture.
3. Regular Cleaning: Establish a regular cleaning routine to keep mold at bay.
4. Use Mold-Resistant Products: Consider using mold-resistant paints, caulking, and shower curtains.
5. Keep the Shower Dry: If possible, leave the shower door open after use to allow air circulation.
Frequently Asked Questions
1. How often should I clean my shower to prevent mold?
Aim to clean your shower at least once a week. This will help limit mold growth and keep your bathroom looking fresh.
2. Can I use bleach to clean mold?
While bleach can kill mold, it may not effectively remove it from porous surfaces like grout. Additionally, it can release harmful fumes, so use it with caution and ensure proper ventilation.
3. Is mold in the shower harmful?
Yes, mold can pose health risks, especially for individuals with allergies or respiratory issues. It’s essential to address mold promptly.
4. What’s the best way to remove mold from grout?
A mixture of baking soda and vinegar or hydrogen peroxide can effectively clean mold from grout. Scrubbing with a toothbrush can help reach stubborn spots.
5. Why does mold keep coming back in my shower?
Persistent mold growth may be due to inadequate ventilation, moisture retention, or not cleaning regularly. Assess these factors to improve your situation.
6. Can I prevent mold without chemicals?
Yes, regular cleaning with natural solutions like vinegar and baking soda can help prevent mold growth without harsh chemicals.
By following these guidelines, you can effectively tackle shower mold and maintain a clean, healthy bathroom environment. Stay tuned for Part 2, where we’ll delve into advanced cleaning techniques and products for tougher mold challenges.