
Moldy Bathroom Grout Cleaning Guide Part 1
Introduction
Moldy bathroom grout is a common issue that many homeowners face. Not only does it look unsightly, but it can also lead to various problems if left unchecked. This guide will provide you with practical steps to effectively clean moldy grout, ensuring your bathroom remains hygienic and aesthetically pleasing.
What Causes Moldy Grout?
Mold and mildew thrive in damp environments, making bathrooms an ideal breeding ground. The combination of moisture, humidity, and organic materials (like soap scum) creates the perfect conditions for mold to grow. Grout, being porous, can easily absorb moisture and become a host for these unwanted guests.
Why This Problem Happens
1. High Humidity: Bathrooms often have high humidity levels, especially after hot showers. This excess moisture can penetrate grout, leading to mold growth.
2. Poor Ventilation: Lack of proper ventilation can trap moisture in the air, further exacerbating the problem.
3. Neglected Cleaning: Regular cleaning helps remove soap scum and mildew, but neglecting this task allows mold to take hold.
4. Water Leaks: Hidden leaks can keep grout damp, providing a consistent environment for mold.
5. Old Grout: Aging grout may crack or deteriorate, making it more susceptible to mold.
How to Fix Moldy Grout (Step-by-Step)
Step 1: Gather Your Supplies
Before you start, gather the following items:
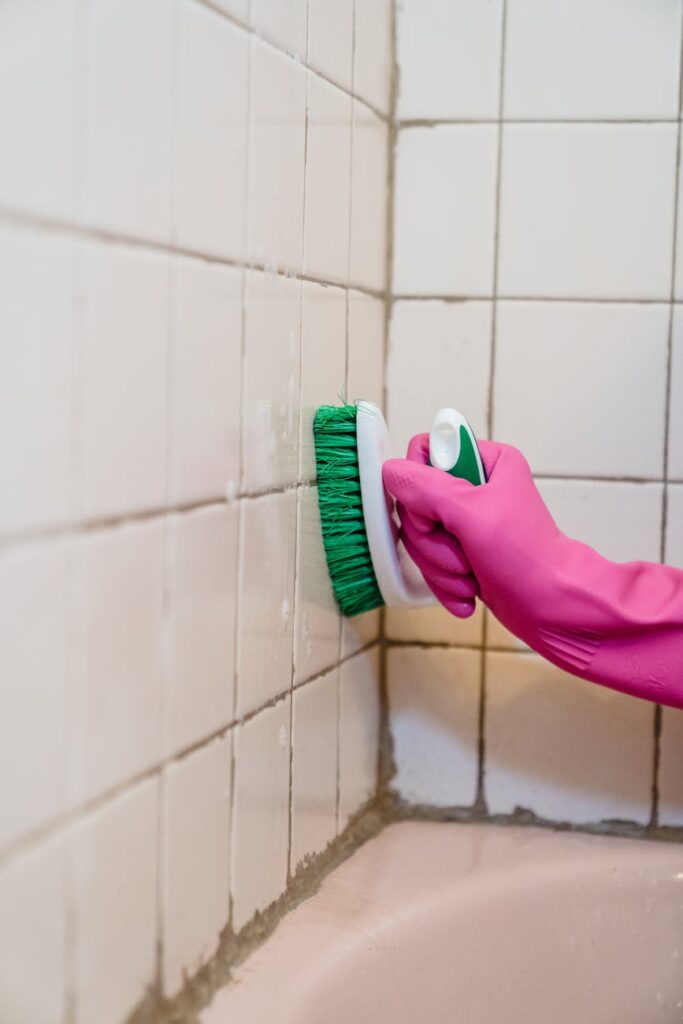
- Rubber gloves
- A mask (to avoid inhaling mold spores)
- A stiff-bristled brush or toothbrush
- Spray bottle
- Cleaning solutions (vinegar, baking soda, or bleach)
- Soft cloths or paper towels
- Bucket
Step 2: Choose Your Cleaning Solution
Option 1: Vinegar and Baking Soda
1. Mix equal parts of vinegar and water in a spray bottle.
2. Sprinkle baking soda on the moldy grout areas.
Option 2: Bleach Solution
1. Dilute one part bleach with three parts water in a bucket.
2. Use this solution for tougher mold stains.
Step 3: Apply the Cleaning Solution
1. Spray your chosen solution generously on the moldy grout.
2. Let it sit for 10-15 minutes to penetrate the mold.
Step 4: Scrub the Grout
1. Use a stiff-bristled brush or an old toothbrush to scrub the grout.
2. Focus on areas with heavy mold growth, using circular motions.
Step 5: Rinse Thoroughly
1. Rinse the area with warm water to remove any remaining cleaning solution and loosened mold.
2. Use a cloth or sponge to wipe down the tiles and grout.
Step 6: Dry the Area
1. Dry the grout with a clean cloth or allow it to air dry completely.
2. Ensure the bathroom is well-ventilated to prevent future mold growth.
Best Cleaning Methods
1. Vinegar and Baking Soda: This natural solution is effective and safe. The acidity of vinegar breaks down mold, while baking soda acts as a gentle abrasive.
2. Bleach: A strong disinfectant, bleach can eliminate mold quickly. However, it should be used with caution due to its harshness and potential to discolor grout.
3. Commercial Mold Removers: If natural methods fail, consider a store-bought mold remover. Always follow the manufacturer’s instructions for the best results.
4. Hydrogen Peroxide: A non-toxic alternative to bleach, hydrogen peroxide can effectively kill mold without harsh chemicals.
Common Mistakes to Avoid
1. Using Too Much Water: Excess water can seep into grout, worsening the problem. Use only as much as needed.
2. Not Scrubbing Thoroughly: A quick wipe won’t eliminate mold. Ensure you scrub thoroughly to remove all traces.
3. Ignoring Ventilation: Cleaning without proper ventilation can trap moisture, increasing the likelihood of mold returning.
4. Rushing the Process: Allow cleaning solutions to sit for the recommended time. Rushing can lead to ineffective cleaning.
5. Using Abrasive Tools: Avoid steel wool or sharp objects, which can damage the grout.
Prevention Tips
1. Ventilation: Ensure your bathroom is well-ventilated. Open windows or use exhaust fans to reduce humidity.
2. Regular Cleaning: Make grout cleaning a regular part of your cleaning routine to prevent buildup.
3. Seal Grout: Consider applying a grout sealer after cleaning to make it less porous and resistant to mold.
4. Fix Leaks: Repair any plumbing issues promptly to prevent moisture buildup.
5. Use Mold-Resistant Products: Consider using mold-resistant caulk and grout for new installations.
Frequently Asked Questions
1. How often should I clean my bathroom grout?
Aim to clean your grout at least once a month to prevent mold buildup.
2. Can I use vinegar on colored grout?
Vinegar can lighten colored grout. Test a small area first before applying it widely.
3. Is bleach safe for bathroom use?
Yes, but ensure proper ventilation and avoid mixing it with other cleaners, as it can create toxic fumes.
4. What is the best way to remove stubborn mold stains?
A combination of baking soda and vinegar or a commercial mold remover usually works best.
5. Can moldy grout cause health problems?
Yes, mold can lead to respiratory issues or allergies. It’s best to address mold promptly.
6. How can I tell if my grout needs sealing?
If water soaks into the grout instead of beading up, it’s time to apply a sealer.
By following these steps and tips, you can keep your bathroom grout clean and mold-free, ensuring a healthier and more pleasant living space. Stay tuned for Part 2, where we will dive deeper into advanced cleaning techniques and solutions!