
Grout Mold Removal: Mould & Damp Guide Part 1
Introduction
Mould and dampness are common issues in homes, especially in areas like bathrooms and kitchens. Grout, the material used to fill the spaces between tiles, is particularly vulnerable to mould growth. This guide will help you understand the causes of mould and damp, outline effective removal methods, and provide tips to prevent future occurrences.
What Causes Mould & Damp?
Mould thrives in damp environments where moisture is present. Several factors contribute to mould growth in grout:
- High Humidity: Areas with high humidity levels, such as bathrooms and kitchens, create a conducive environment for mould.
- Poor Ventilation: Lack of airflow can trap moisture, allowing mould to flourish.
- Water Leaks: Leaking pipes or fixtures can introduce excess water to grout, leading to dampness.
- Condensation: Warm air meeting cold surfaces can cause condensation, resulting in moisture accumulation.
- Rubber gloves
- Protective eyewear
- Mask (to avoid inhaling spores)
- Scrub brush or old toothbrush
- Spray bottle
- Cleaning solution (vinegar, baking soda, or a commercial mould remover)
- Bleach (optional, for tough stains)
- Vinegar: A natural and safe option, vinegar can kill most mould species and is non-toxic.
- Baking Soda: This is a gentle abrasive that can help lift mould without damaging grout.
- Bleach: While effective for tough stains, use bleach sparingly as it can discolor grout and release harmful fumes.
- Commercial Cleaners: These often contain powerful ingredients designed specifically for mould removal. Always follow safety instructions.
- Improve Ventilation: Use exhaust fans in bathrooms and kitchens. Open windows when possible.
- Control Humidity: Use a dehumidifier in high-humidity areas to maintain optimal moisture levels.
- Regular Cleaning: Clean grout regularly with vinegar or baking soda to keep mould at bay.
- Seal Grout: Consider applying a grout sealer to create a barrier against moisture.
- Fix Leaks Promptly: Address any leaks immediately to prevent water accumulation.
Understanding these causes will help you tackle mould effectively.
Why This Problem Happens
The presence of mould in grout is not just an aesthetic issue; it can lead to structural damage and health concerns. Mould can weaken the integrity of grout and tiles, leading to costly repairs. Additionally, mould spores can trigger allergies and respiratory problems in sensitive individuals.
How to Fix Mould & Damp (Step-by-Step)
Step 1: Gather Your Supplies
Before starting, gather the following supplies:
Step 2: Prepare the Area
1. Ventilate the Space: Open windows and doors to ensure adequate airflow.
2. Remove Items: Take away any items around the affected area to prevent contamination.
Step 3: Apply Cleaning Solution
1. Vinegar Solution: Pour white vinegar into a spray bottle and spray it directly onto the mouldy grout. Let it sit for at least 30 minutes.
2. Baking Soda Paste: For stubborn mould, mix baking soda with water to create a paste. Apply it to the grout and let it sit for 10-15 minutes.
3. Commercial Cleaner: If using a commercial mould remover, follow the manufacturer’s instructions for application.
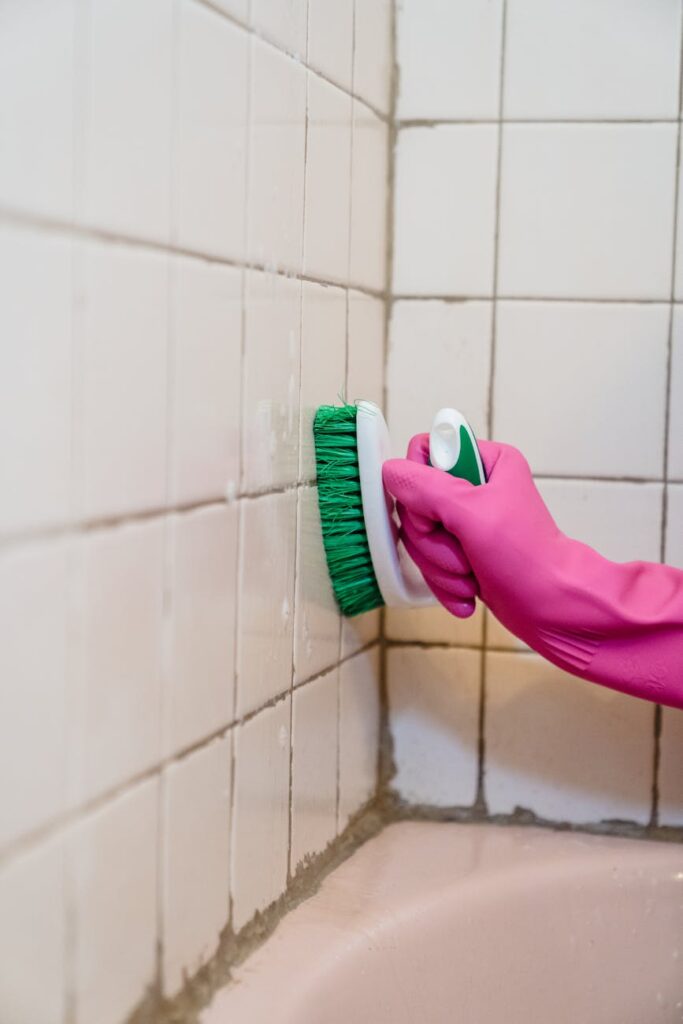
Step 4: Scrub the Grout
Using a scrub brush or an old toothbrush, vigorously scrub the grout lines. Focus on the most affected areas. The combination of the cleaning solution and physical scrubbing will help lift the mould.
Step 5: Rinse and Dry
1. Rinse the Area: Use clean water to rinse the grout thoroughly. Remove all cleaning solution residues.
2. Dry the Surface: Wipe down the area with a dry cloth or towel. Ensure the grout is completely dry to prevent future mould growth.
Step 6: Inspect for Leaks
After cleaning, check for any leaks in pipes or fixtures. If you find any, repair them promptly to eliminate moisture sources.
Best Cleaning Methods
Several methods can be effective for removing mould from grout:
Common Mistakes to Avoid
1. Using Harsh Chemicals: Avoid using strong chemicals that can damage grout or tiles. Opt for milder solutions first.
2. Ignoring Ventilation: Not ventilating the space while cleaning can lead to inhaling spores or fumes.
3. Skipping Drying: Failing to dry the area properly can result in quick regrowth of mould.
4. Not Addressing Underlying Issues: If you don’t fix leaks or improve ventilation, mould will return.
Prevention Tips
Preventing mould from returning is crucial for maintaining clean grout:
Frequently Asked Questions
1. How often should I clean my grout to prevent mould?
Aim to clean grout every 1-2 months, especially in high-humidity areas.
2. Can I use bleach on all types of grout?
Bleach can discolor some types of grout. Always test a small, inconspicuous area first.
3. What is the best way to remove black mould from grout?
Vinegar or a baking soda paste are effective methods. For severe cases, consider a commercial mould remover.
4. How do I know if my mould is serious?
If mould covers a large area (greater than 10 square feet) or if you have persistent moisture problems, consult a professional.
5. Can I prevent mould without chemicals?
Yes, regular cleaning with natural solutions like vinegar and baking soda can effectively prevent mould growth.
6. What should I do if I have a persistent mould problem?
If mould keeps returning despite your efforts, consider hiring a professional to assess and address underlying moisture issues.
By following this guide, you can effectively tackle mould and damp in your grout, ensuring a cleaner, healthier home. Stay proactive with cleaning and prevention to keep mould at bay!